|
 |
 Maintanance
Ghetto Tubeless Ghetto tubeless walkthrough.
Required Items.
Double sided sticky tape.
A final essential you should buy at the same time is a tubeless repair kit which will allow you to fix most trailside punctures without removing the tyre from the rim.
Firstly choose whether you are going to use a Schrader or Presta valve in your system. If your wheels currently take a Schrader/car type valve then that is what you will use for the ghetto setup.
For presta rims the choice is a little more complicated. You can use a presta valve but it makes initial inflation and topping up the sealant harder.
For rims wider that 17mm between the walls I would recommend drilling the valve hole out to 8mm and using a Schrader valve tube.
Drilling your rims can be pretty nerve wracking but, to be honest, is pretty easy. Use a sharp 8mm metal drill bit.
Using blunt bits is just asking for trouble. Drill from outside of the wheel towards the hub. 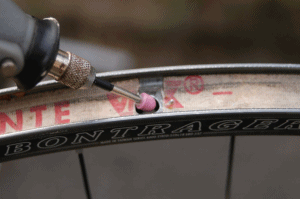 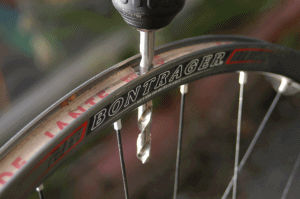
Brush away any swarf and remove any sharp edges on both the inner and outer rim surfaces.
Fit your tyre on one side of the rim and push the bead into the groove in the rim wall.
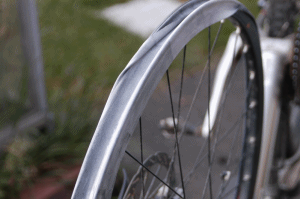
Check the gap between the tyre bead and the base of the rim. This gap depends on the tyre and rim combination.
Remove the tyre and if there was no gap or a very small gap of under a millimeter run a layer of double sided tape around the bed of the rim. If the gap was larger use the foam packing tape to ‘raise ‘ the rim bed as required to reduce this gap to around one millimetre.
If you leave this gap too large it can cause air to burp out of the tyre under hard cornering if the tyre bead is pushed away from the rim wall. With the gap removed the tyre bead still seals against the base of the rim even when pushed away from the rim wall.  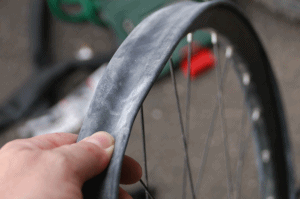
Stretch the 20" inner tube over the rim and even it out as much as possible.
Inflate it slightly to make sure it's seated evenly without twisting then push the tube down onto the base of the rim so that it sticks to the entire rim bed. Once you’ve done this all the way round the rim make an incision opposite the valve. Only inflate the tube by a pump or two as otherwise, when you plunge the scissors in, it will fly off the rim meaning a refit.
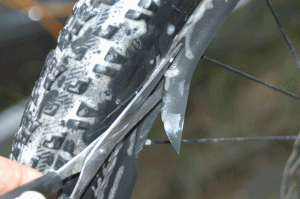
Cut along the centre of the tube all the way round the outside of the wheel.
Lay the excess over the sides of the rim.
Slop soapy water all over the tube and fit the tyre. Depending on your choice of tyre it may be a little more difficult than normal as the 20” tube has raised the edge of the rim slightly.
Remove the valve core from the inner tube. If you are using Schwalbe innertubes recommended they have an integrated valve removal tool in the valve cap, otherwise a small pair of bull nose plyers may work. Place it into the core, and unscrew it.
Soap up the tyre again, attach your track pump or compressor and inflate. You have to pump pretty fast to get it to seat with a track pump. 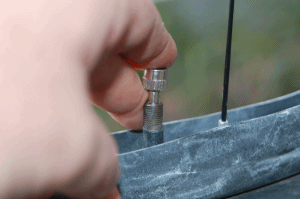 
Pressing the tyre against the rim next to the valve helps it seal and pop the tyre on the rim bead pretty easily.
Voila, one inflated tubeless tyre!
Make sure the tyre will seat before adding sealant.
Remove your pump and the tyre will deflate
There are several ways to add the sealant. The first is to position the valve at around 45deg to the floor then pour it through the valve stem before refitting the valve. If you are using a tube without a removable valve core then you need to take a small section of tyre next to the valve back off the rim and pour it in carefully before refitting the tyre and re-inflating.
If possible go for a 10 min ride to help it seal.
Coating the tyre with soapy water will reveal any pinhole leaks, shake the sealant onto these areas to help them seal.
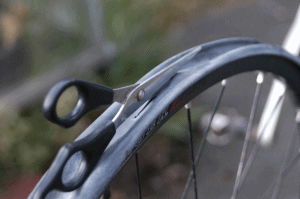
Once happy with your seal trim away the excess innertube. You can use a Stanley blade to get a very close cut but scissors are a far safer option.
And the finished article...
Leaving a little excess tube outside the rim makes tyre swaps far easier as does the double sided tape holding the 20” ‘rim strip’ in place. Don't worry too much about knicking the 20" tube on the rim edge as you fit and remove tyres. The seal is actually further inside the rim where the tyre bead sits.
For more tips head to the extensive MTBBritain Ghetto and Tubeless forum.
Chris M & Doug P. |
![]()
![]()
top | home | beginners | fundamentals | advanced | downhill | resources
Copyright ©2009 MTB Techniques | All rights reserved
The information on this site should be taken as a broad guide only and is open to interpretation and misunderstanding. You should consult a qualified instructor for more information about any of the tips given. MTB Techniques cannot accept responsibility or liability for accuracy, clarity or your interpretation of any of the topics provided. Mountain biking can be dangerous. You must make sure you understand the level of risk involved and wear suitable protective equipment whenever you ride.